bitty.and.bunny: how-to
Showing posts with label how-to. Show all posts

Monday, October 6, 2014

How To: Style a Striped Dress 6 Ways

In honor of the changing seasons (hot-cold-hot again), and because it's Monday and I'm lazy, I'm recycling what is probably my favorite of the guest posts I've done. In case you missed it when it was up on Rachel the Hat, here are six creative ways to wear the same dress over and over (no matter the season).

Quick side note: Be sure to stop by Jeans and a Teacup today, where Jessica's featuring me on her Tour Through Blogland. (Stay tuned for my tour coming next week).


1. add a T-shirt shirt under:
Wear a thin T-shirt under the dress. This not only provides a little more coverage, but it adds some visual interest as well. In this case, the simple graphic print of the dress really complements the pop of turquoise provided by the shirt.


2. add a T-shirt shirt over:
Knot a T-shirt over your dress for a casual look that allows you to easily add any color you like just by changing the shirt. 

3. "tuck" in a T-shirt:
Belt a T-shirt over the dress to create the illusion of wearing a separate top and skirt. Not sure how?  Here's a goof-proof tip: knot the shirt in the back or front, tuck the knot under, then belt it. 

4. add a cardigan:
For a relaxed look, wear an open cardi over the dress, and cinch it in with a belt to add shape.

5. add a vest:
For those extra-warm days when you just can't fathom anything covering your arms, throw a vest over your dress to keep it interesting.

6. add lots of layers:
When the temperatures begin to drop, pile on the layers for a cozy look. Here, I belted a chambray button up and threw on a chunky cardi over it. A scarf and boots complete the outfit and keep me feeling warm & fuzzy all day long.


I hope this inspires you to remix your favorite pieces in new and creative ways!


link up with my homies

Friday, May 2, 2014

UniWigs Extension Review & Tutorial


A little while ago I received the pretty, brown/pink ombré clip-in extension above to try, courtesy of UniWigs.  I've never worn extensions before, so I was a little lost as to how to go about putting it in my hair (spoiler alert: it is ridiculously easy).   Luckily I was able to take it with me when I visited my sister, who's an amazing hair stylist.  (Really, the girl's got talent).  She walked me through it and even showed me a helpful little trick for all of us fine-haired ladies (see step 2).  Sadly the extension was a tad too big for my abnormally tiny head, so I enlisted the help of my lovely friend and proud owner of a normal sized head, Amy, for this tutorial.  (Thanks, Amy!  You're a peach!)

My impressions of the extensions:  Besides the beautiful color, they're really soft and smooth, they look realistic, and appear to be very well constructed.  They come with these little snapping clips sewn into the extension (you'll see them below), that literally make applying the extensions a snap!

Let's get started.  All you need is a comb and your extension.  Here we go.

Step 1. Since the extension is just one long piece, you're going to want to part your hair horizontally wherever you'd like to apply the it.  Clip it up and out of the way (or if you forgot to grab a clip, just ask your friend to awkwardly hold her hair out of the way for you).
Step 2 (optional). If you have fine hair, gently tease it right near the part to give the extensions a little more to hold onto.
Step 3. Open all of the clips along the extension.
Step 4.  Beginning on one end of your head, slip the clips one by one into the teased hair, and snap them closed.  Move horizontally across your head, inserting clips and snapping them closed as you go.  
Done! ....almost.....

As you can see, the extension didn't quite blend in with Amy's hair, so I decided to make a side fishtail braid to mask the transition between the real hair and the and faux.  

In retrospect I should have taken my tiny head into consideration when choosing this one-piece extension, or at the very least checked the measurements.  UniWigs also offers extensions that come as several smaller pieces, which I think would have worked better for me.  I love that this extension is so easy to apply, and I also love that it can be worked into so many different hair dos (like maybe a top knot or a funky braided side bun).  My verdict: I'd recommend it.  Just make sure to check the measurements first, and keep in mind that if your hair isn't the right color or length, the extension may not blend in when you wear your hair down.


Disclaimer: I received extensions from UniWigs in exchange for my review.  All opinions are 100% my own.


Thursday, May 23, 2013

Beauty Bit: Messy Side Bun DIY

      I don't know if I've mentioned this, but my sister is a pretty kick ass hair stylist.  Sometimes when we go out, I ask her to help me with my hair and she'll whip up this sculptural, funky side bun that I love.  I never saw how she did it, and always assumed it was just a whirlwind of backcombing, hairspray, and talent.  Well, that part's true, but even though the end result looks intricate and fancy, you don't actually need the talent to pull this off.  The backcombing and hairspray are necessary, but skill is totally optional.  After we made this tutorial and she broke it down step by step, I realized that even someone inept at doing her own hair (me!) can pull this off (evidence that I was able to accomplish this feat all on my own here).
      1. Gather your supplies.  You'll need some hair elastics, bobby pins, hairspray, and a teaser brush or comb (for backcombing your hair).
      2. Pull your hair into a low, side pony and secure with an elastic.  3. Gently backcomb the ponytail, leaving a small section un-teased.  Don't backcomb too tightly; you want the hair puffy & fluffy.
      4. Braid the un-teased section of hair & secure with a small elastic.

      5. Begin sculpting the backcombed hair into a bun shape, securing in various places with bobby pins.  Don't worry about perfection, this is most definitely a messy-is-better kind of deal.  Leave the braid out of the bun for the time being.
       
      6. Wrap the braid around the bun and secure with a bobby pin or two, taking care to hide both the pin & the end of the braid into the bun.  7. Spray with hairspray for a stronger hold.
      A huge thanks to my super creative & talented sister, Jen, for sharing the secret of one of her go-to hairstyles.  If you're in the Ft. Lauderdale, FL area, be sure to stop by The Factory Salon and ask for her.  I promise you won't regret it.


      Linking here.

        Friday, August 17, 2012

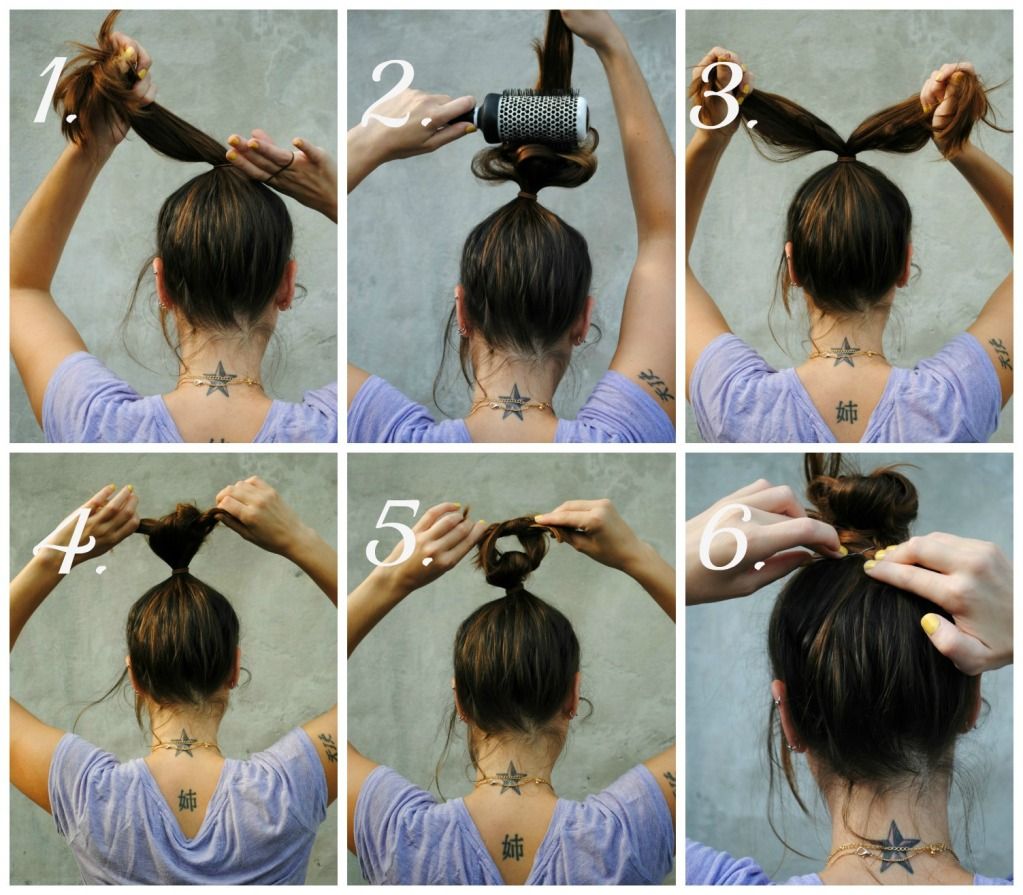
        Beauty Bit: how to style a top knot

        This is one version of how I style my top knot.
        This hairstyle is so easy, it barely needs an explanation.
        But in case you're into that sort of thing, I've included instructions below.
        1.Pull your hair into a high ponytail and secure with an elastic.  2. If your hair is fine, you may want to back comb a little for some volume. (Yep, I back comb with brush.  I told you, I'm a rebel.)  3. Divide the pony in half (this doesn't have to be exact).  4. Tie the halves in a basic knot.  5. If your hair is long enough, tie it a second time.  6. Secure the ends with bobby pins (I like to cris-cross two pins because it's a more secure hold).
        Easy peasy!

        Pin It button on image hover