bitty.and.bunny: diy
Showing posts with label diy. Show all posts

Saturday, November 22, 2014

DIY Vintage Infinity Scarf

A few years ago I inherited a whole bunch of beautiful vintage scarves and kerchiefs from my grandma. (She was a stylish lady, that one - had an entire dresser drawer full of them, I kid you not). I made this one out of two of my favorites and it's been a staple in my wardrobe ever since. I love wearing it - it's light and airy and one-of-a-kind, and can even fool you into thinking that a tank top and jorts look kind of fancy.

Lately I've gotten so many compliments on it that I thought it might be time to share the secret of its construction with you. Note: that was sarcastic. This DIY is so ridiculously easy I almost feel silly explaining it.

1. Gather your supplies.  You'll need just 3 things:
  • sewing apparatus (machine or manual)
  • pins
  • at least 2 scarves/kerchiefs you want to use (the more you use, the longer your scarf will be). If they're the same width at the ends, great! If not, don't worry; I promise you won't see it in the end.
(1 ½.) As you can see, these two are different widths. That's ok.  By definition infinity scarves are bunched and folded and messy and therefore wonderful at hiding flaws and imperfections. No one will notice*.
2. Line the ends of the scarves up together with the outsides facing in.  If one is shorter than the other, just try to center it as well as possible.
3. Pin the scarves together so they don't wiggle around when you sew them.
4. Sew the ends together.  Repeat the same process for the other side.  Voila.  Your two scarves have just become one.
5. Loop it around your neck and rock it. 


*Unless you completely forget to make any attempt to hide those flaws....like all of the white stitching you just did, for instance.


Linking up with these ladies.


Friday, March 14, 2014

Recipe: S'mores Croissants

Click here to enter the Craftsy class giveaway!!

I readily admit that the kitchen is not my domain.  I love to eat baked goods, but I don't really enjoy the process of baking baked goods.  Therefore I have become something of a 3-ingredient-or-less-recipe aficionado (other favorites include Beer Bread & Cream Soda Cupcakes - stay tuned for those). 

In the spirit of what I affectionately call lazy baking, I thought I'd share a really quick and easy recipe with you; S'mores Croissants.  Yeah, really.

gather your supplies:
  • chocolate chips, preferably of the mini variety*  
  • ditto for the size of the marshmallows
  • crescent rolls (the really fancy kind that come in a tube)
  • baking sheet
*it's a scientific fact that mini sized are more fun


1. pop open the package of croissants & roll them out onto the baking sheet
2. add chocolate chips & marshmallows
3. roll croissants up with the chocolate chips & marshmallows inside
4. bake according to package instructions
...and try not to over bake them like I did, otherwise your marshmallow will liquefy and leak out onto the baking sheet.  And you don't want to share all that delicious, tasty gooey-ness with an inanimate object, now do you?

Voila!  The laziest form of baking.  Enjoy!


Linking here today.


Thursday, March 6, 2014

Craftsy Class Giveaway


Have you guys heard about Craftsy.com yet?  No?  Well, settle in for a sweet surprise. Craftsy is a virtual school, specializing in all things crafty.  They offer classes to teach you the nuances of just about any craft you can imagine, from knitting to cake decorating to fine art to photography (and lots of others in between).  I've had the pleasure of taking a sewing class with Craftsy, and after the first 15 minutes, I had learned a new technique that the last 10 years with my sewing machine alone couldn't teach me.

Here are my Top 3 Reasons why you should take a Craftsy class:

  1. You can take classes on your own schedule, whenever it's convenient.  You can even attend class on your tablet or smartphone.
  2. Interact with the instructor and other students in the classroom forum.  Ask as many questions as you need.  The instructor always responds super fast.
  3. They offer over 30 free classes, like knife skills.  I just signed up because I don't even know how to properly dice an onion.  But in a couple hours, I'll be an expert.

And now for the best part, Craftsy is giving away a free class to one winner!  All you have to do is click here and register, and you'll be entered to win.  It's that simple.  While you're there, be sure to sign up for some of those free mini classes , too!

These are some of my favorites.  Given the opportunity, I'd be all over these classes.


Which class will you take if you win??

Giveaway ends Monday, March 24 at 11:59pm EST and is open to everyone, everywhere, so don't hesitate to enter.
Good luck!


Thursday, May 23, 2013

Beauty Bit: Messy Side Bun DIY

      I don't know if I've mentioned this, but my sister is a pretty kick ass hair stylist.  Sometimes when we go out, I ask her to help me with my hair and she'll whip up this sculptural, funky side bun that I love.  I never saw how she did it, and always assumed it was just a whirlwind of backcombing, hairspray, and talent.  Well, that part's true, but even though the end result looks intricate and fancy, you don't actually need the talent to pull this off.  The backcombing and hairspray are necessary, but skill is totally optional.  After we made this tutorial and she broke it down step by step, I realized that even someone inept at doing her own hair (me!) can pull this off (evidence that I was able to accomplish this feat all on my own here).
      1. Gather your supplies.  You'll need some hair elastics, bobby pins, hairspray, and a teaser brush or comb (for backcombing your hair).
      2. Pull your hair into a low, side pony and secure with an elastic.  3. Gently backcomb the ponytail, leaving a small section un-teased.  Don't backcomb too tightly; you want the hair puffy & fluffy.
      4. Braid the un-teased section of hair & secure with a small elastic.

      5. Begin sculpting the backcombed hair into a bun shape, securing in various places with bobby pins.  Don't worry about perfection, this is most definitely a messy-is-better kind of deal.  Leave the braid out of the bun for the time being.
       
      6. Wrap the braid around the bun and secure with a bobby pin or two, taking care to hide both the pin & the end of the braid into the bun.  7. Spray with hairspray for a stronger hold.
      A huge thanks to my super creative & talented sister, Jen, for sharing the secret of one of her go-to hairstyles.  If you're in the Ft. Lauderdale, FL area, be sure to stop by The Factory Salon and ask for her.  I promise you won't regret it.


      Linking here.

        Wednesday, March 27, 2013

        Shoes Your Own Adventure

        {target sweatshirt & sneakers | ON jeans | diy scarf | sprout watch}


        Remember those "Choose Your Own Adventure" books?  I loved those as a kid.  Plus I finally took the plunge and got myself a pair of fabulously fugly wedge sneakers.  So, yeah, that explains my corny post title.  Sometimes it's hard to resist a terrible pun.

        Anyway, I can't believe how much I love these sneakers!  I never thought a high heel could be so comfy, but I guess putting it in a sneaker is a pretty brilliant tactic.  I think the best part about them is that the wedge is totally hidden, so it just kind of looks like I magically grew 3 inches.  If you're anything like me (ie. short, so very very short), this is sort of a dream come true.


        Linking up with these peeps.

        Monday, March 25, 2013

        Flowy Floral Fashion

        {thrifted sweater (similar) | diy skirt (similar) | ON scarf & tights | steve madden socks | payless booties (similar)}


        Today I'm over at one of my very favorite sites, Cut Out + Keep, to talk clothing and craftiness.  Stop on by to check out the rest of my outfit and to learn how you can make a fishtail skirt like this one for yourself (it's super easy, I promise).


        Today's linkies.

        Thursday, December 13, 2012

        Beauty Bit: Caviar Manicure DIY


        If you've been lurking around Sephora or some of the beauty counters at department stores, you've inevitably seen the new-ish "caviar" manicure.  And while it looks amazing (and might I say perfect for a holiday party?), I find the price to be a bit ridiculous.  I mean, $25 for a bottle of nail polish and some beads?  Please.  Just because it has caviar in the name, doesn't mean it should have a price tag to match.  Here's how to get the same exact effect for way less.  And it's super easy.

        I found this container of microbeads at Michael's for about $3.  You'll also need a small tray to catch the beads (I used the kind that comes with Chinese take out).


        1. Paint one coat of an opaque polish on your nails and let dry. 
        2. Apply a second coat of polish to nails.  
        3. Position the tray under your hand, and while the polish is still wet, shake some of the beads onto your nail.  Don't worry about the excess beads falling off; they'll be caught in the tray.  
        4. Press the beads firmly into the nail to ensure a longer lasting bond.  If your polish dries quickly, I recommend doing this process one nail at a time.
        5. Top with a clear coat to seal in the beads.
        6. Using a small funnel, or piece of paper rolled into a cone (leaving a small opening at the bottom), pour the extra beads from the tray back into the container.
        7. Admire your mani, and give yourself a pat on the back knowing that you didn't get suckered into spending 25 smackers on your nails.  Smug sense of self-satisfaction optional.

        A word of advice: Do your nails the day you want to wear them because this is not the strongest or sturdiest of embellishments.  If you use your hands for anything - anything at all - the beads will start falling off.  You have been warned.


        Friday, October 26, 2012

        Knitting Pretty

        {target sweater (similar) & chambray  |  f21 shorts  |  report boots (crazy similar)  |  anjolee ring, c/o  |  diy cowl (similar)}


        I know I just explained how I'm ok with constant repetition, so let's just never mind the fact that I'm wearing chambray again.  Or the fact that I'm wearing shorts with tights again.  I'm more excited about this infinity scarf that I knit.  Yeah, that one.  Up there.  The one that looks all profesh and store bought and stuff.  I've been knitting for years, but normally my finished items don't come out exactly like I've pictured them in my head (I believe this is called your-imagination-knits-better-than-you-do-in-real-life syndrome).  But this time it came out exactly like I wanted.  It only took three balls of yarn, one week of almost non-stop knitting, and a surprisingly small amount of swearing.  This scarf is my new favorite everything.  So please give her a warm welcome because you'll be seeing lots more of this cozy little cowl in the months to come.


        Come check out where I'm linking up.

        Friday, August 17, 2012

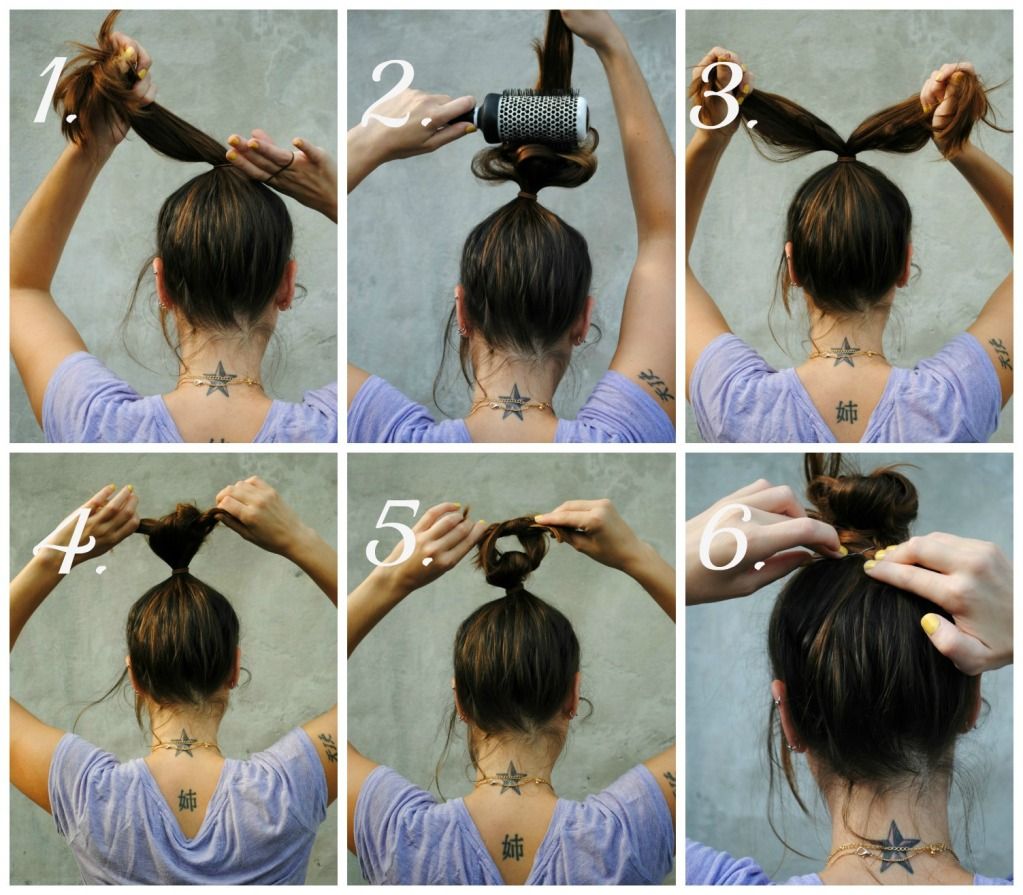
        Beauty Bit: how to style a top knot

        This is one version of how I style my top knot.
        This hairstyle is so easy, it barely needs an explanation.
        But in case you're into that sort of thing, I've included instructions below.
        1.Pull your hair into a high ponytail and secure with an elastic.  2. If your hair is fine, you may want to back comb a little for some volume. (Yep, I back comb with brush.  I told you, I'm a rebel.)  3. Divide the pony in half (this doesn't have to be exact).  4. Tie the halves in a basic knot.  5. If your hair is long enough, tie it a second time.  6. Secure the ends with bobby pins (I like to cris-cross two pins because it's a more secure hold).
        Easy peasy!

        Pin It button on image hover